Irresistible Berry Icebox Cake with Vanilla Layers
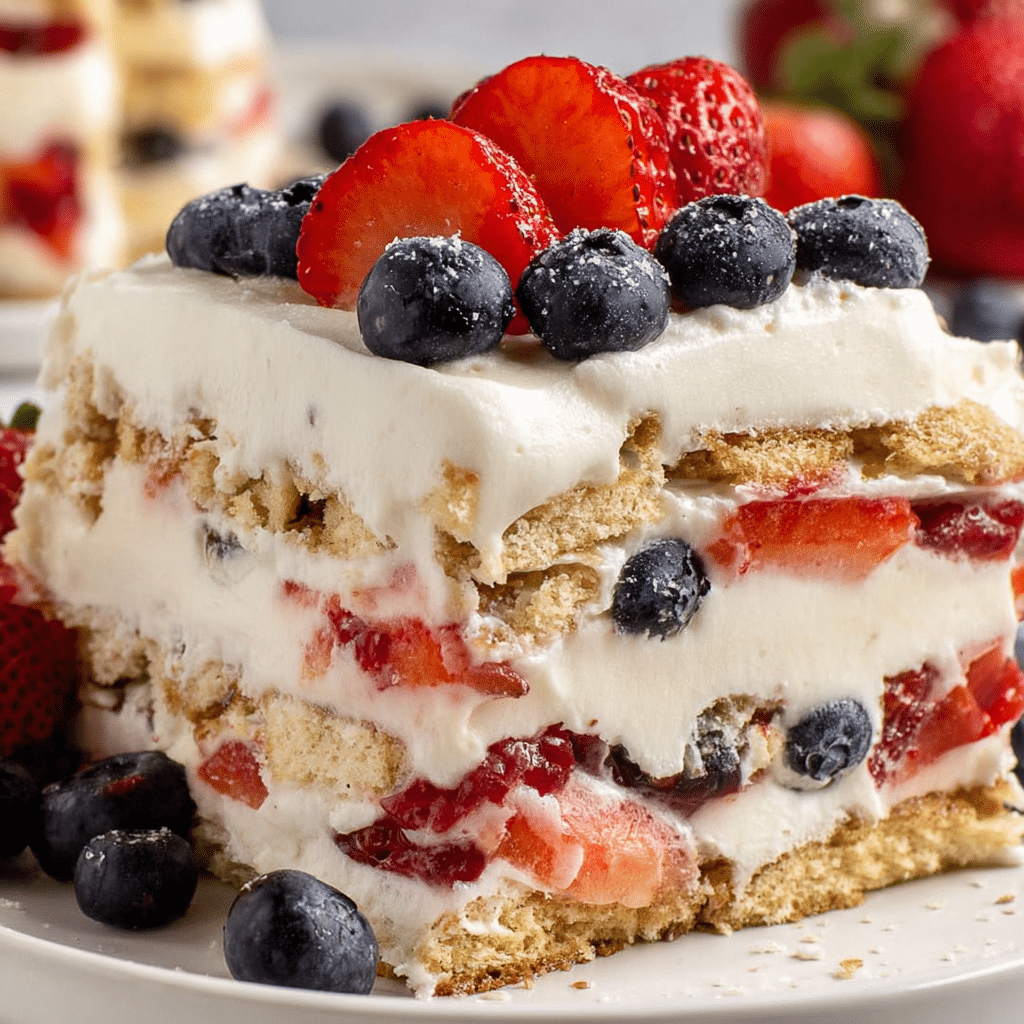
If you’re looking for a refreshing dessert that blends creamy sweetness with vibrant fruit flavors, this Berry Icebox Cake with Vanilla Layers is your new best friend. Imagine luscious layers of velvety vanilla cream effortlessly paired with juicy, ripe berries, all chilled to perfection. This recipe is wonderfully simple, yet delivers a show-stopping treat that’s perfect for any occasion—from summer barbecues to cozy family dinners. Let’s dive into making this irresistibly delicious and visually stunning dessert that will quickly become a favorite in your recipe collection.
Why You’ll Love This Recipe
- Effortlessly Elegant: This Berry Icebox Cake with Vanilla Layers requires minimal baking and uses simple assembly for a stunning finish.
- Fresh and Fruity: Ripe berries add natural sweetness and a pop of color while complementing the creamy vanilla layers perfectly.
- Cool and Refreshing: Chilled to set, this dessert is ideal for warm days or when you want a light but indulgent sweet treat.
- Make-Ahead Friendly: The cake improves as it chills, making it a great option to prepare in advance without stress.
- Customizable Layers: You can easily swap berries or add mix-ins to suit your taste or dietary needs.
Ingredients You’ll Need
This Berry Icebox Cake with Vanilla Layers depends on a handful of simple, staple ingredients that each play a crucial role. From the delicate vanilla cream that brings richness to the crisp, fruity bursts of berry goodness, every bite is a harmonious balance of flavor and texture.
- Heavy Whipping Cream: For making the smooth and fluffy vanilla layers that give the cake its luscious texture.
- Powdered Sugar: Adds just the right amount of sweetness and helps stabilize the whipped cream.
- Pure Vanilla Extract: Infuses warm and aromatic vanilla flavor into the cream layers.
- Fresh Mixed Berries: Strawberries, blueberries, raspberries, and blackberries provide vibrant color and natural tanginess.
- Graham Crackers or Vanilla Wafers: Provide a light, slightly crunchy base that softens as the cake chills, creating perfect textural contrast.
Variations for Berry Icebox Cake with Vanilla Layers
This recipe is incredibly flexible, allowing you to tailor it to your preferences or ingredient availability. Whether you want to boost flavor, change textures, or accommodate dietary needs, here are some creative variations to try!
- Tropical Twist: Swap berries for mango, pineapple, and kiwi slices to create a summery tropical version.
- Dairy-Free Option: Use coconut cream in place of heavy whipping cream for a delicious vegan-friendly layer.
- Chocolate Upgrade: Add a layer of melted dark chocolate between the vanilla cream and berries for an indulgent surprise.
- Nutty Crunch: Sprinkle toasted almonds or pecans between layers to add delightful crunch and depth.
- Low-Sugar Alternative: Use a sugar substitute like erythritol or stevia in the whipped cream for a lighter version.

How to Make Berry Icebox Cake with Vanilla Layers
Step 1: Prepare the Vanilla Whipped Cream
Start by chilling a mixing bowl and whisk attachment in the freezer for 10-15 minutes. Pour the heavy whipping cream into the cold bowl and whip on medium speed until soft peaks form. Gradually add powdered sugar and pure vanilla extract, then continue whipping until firm peaks hold. Set this luscious vanilla cream aside.
Step 2: Layer the Base of the Cake
In a rectangular or springform pan, arrange a single layer of graham crackers or vanilla wafers to cover the bottom completely without large gaps. This creates the foundation and will soften beautifully as it chills.
Step 3: Add Vanilla Cream Layer
Spoon an even layer of the prepared vanilla whipped cream over the crackers, smoothing gently with a spatula. This creamy layer adds softness and richness to each bite.
Step 4: Add the Berries
Scatter a generous layer of fresh mixed berries on top of the whipped cream, ensuring vibrant color and juicy sweetness in every slice.
Step 5: Repeat and Chill
Repeat layering with graham crackers, vanilla whipped cream, and berries until you reach the top of the pan. End with a cream layer so berries sit beautifully on top. Cover and refrigerate the cake for at least 4 hours, ideally overnight, allowing the layers to meld and the crackers to soften perfectly.
Pro Tips for Making Berry Icebox Cake with Vanilla Layers
- Use Room Temperature Berries: Let berries sit out briefly to enhance natural sweetness and avoid cold shock to cream.
- Choose Fresh, Firm Berries: For best texture and flavor, select berries that are not overly ripe or soft.
- Chill Thoroughly: Longer chilling time ensures ideal layering and softening of the crackers.
- Handle Layers Gently: Spread creams carefully to maintain light and airy texture without crushing the crackers.
- Trim for Perfect Presentation: Use a sharp knife to slice cleanly before serving to keep layers distinct and neat.
How to Serve Berry Icebox Cake with Vanilla Layers
Garnishes
Brighten your berry icebox cake with a final garnish of fresh mint leaves, whole berries, and a delicate dusting of powdered sugar. These simple touches add freshness, inviting aroma, and visual appeal that makes your cake Instagram-ready.
Side Dishes
Pair this dessert with a light cup of herbal tea, sparkling water with lemon, or even a scoop of vanilla bean ice cream to complement the creamy vanilla and tart berry flavors perfectly.
Creative Ways to Present
Serve the cake in individual mason jars or clear glasses for charming single servings. Alternatively, tray it on a pretty platter and cut into neat squares for potluck or party-friendly portions.
Make Ahead and Storage
Storing Leftovers
Keep leftovers tightly wrapped in plastic wrap or in an airtight container in the refrigerator to maintain freshness and prevent the cream from absorbing other odors. Consume within 3-4 days for best flavor and texture.
Freezing
This icebox cake freezes well for up to 1 month. Wrap in layers of plastic and foil to avoid freezer burn. Thaw in the refrigerator overnight before serving, keeping in mind that the texture might become slightly softer after freezing.
Reheating
Since this is a chilled dessert, reheating is not recommended. Instead, allow frozen cake to thaw properly for the ideal creamy and fruity experience.
FAQs
Can I use frozen berries in Berry Icebox Cake with Vanilla Layers?
Yes, frozen berries can be used, but it’s best to thaw and drain them well to avoid excess moisture that could make the layers soggy.
Is there a gluten-free option for this dessert?
Absolutely! Simply substitute gluten-free crackers or wafers for the traditional graham crackers to enjoy this cake gluten-free.
How long does the cake need to chill?
The cake should chill for at least 4 hours, but overnight chilling allows flavors to meld beautifully and ensures perfect texture.
Can I make this cake vegan?
Yes! Replace the heavy cream with coconut cream or a vegan whipped topping, and use dairy-free vanilla wafers to keep it completely plant-based.
What is the best way to cut the cake?
Use a sharp serrated knife dipped in hot water for clean, smooth slices that preserve the visual layers without crushing the cake.
Final Thoughts
Ready to delight your taste buds and impress your guests? This Berry Icebox Cake with Vanilla Layers is not just a dessert, it’s a celebration of fresh flavors, creamy textures, and easy preparation. Whether it’s a sunny afternoon or a special gathering, this recipe brings joy with every bite. Give it a try and watch it become your go-to treat, sharing sweetness and smiles around your table.
Related Posts
- How to Make No-Bake Chocolate Rice Krispie Cookies Fast
- How to Make Fruit Pizza with Sugar Cookie Crust
- How to Make Paleo Coffee Popsicles Fast
Berry Icebox Cake with Vanilla Layers
Berry Icebox Cake with Vanilla Layers is a refreshing no-bake dessert featuring luscious layers of velvety vanilla whipped cream, crisp graham crackers or vanilla wafers, and vibrant fresh mixed berries. Chilled to perfection, this elegant, fruity, and creamy treat is perfect for warm days, special occasions, or as a make-ahead crowd-pleaser.
- Prep Time: 20 minutes
- Cook Time: 0 minutes
- Total Time: 4 hours 20 minutes (including chilling time)
- Yield: 8-10 servings 1x
- Category: Dessert
- Method: No-Bake, Chilling
- Cuisine: American
- Diet: Gluten Free (when using gluten-free crackers)
Ingredients
Vanilla Whipped Cream
- 2 cups heavy whipping cream, cold
- 1/2 cup powdered sugar
- 1 teaspoon pure vanilla extract
Fruit Layer
- 2 cups fresh mixed berries (strawberries, blueberries, raspberries, blackberries)
Base Layer
- 1 package graham crackers or vanilla wafers (about 9–12 ounces)
Instructions
- Prepare the Vanilla Whipped Cream: Chill a mixing bowl and whisk attachment in the freezer for 10–15 minutes. Pour the cold heavy whipping cream into the bowl and whip on medium speed until soft peaks form. Gradually add powdered sugar and pure vanilla extract, then continue whipping until firm peaks hold. Set aside the luscious vanilla cream.
- Layer the Base of the Cake: In a rectangular or springform pan, arrange a single layer of graham crackers or vanilla wafers to completely cover the bottom without large gaps, creating the cake’s foundation.
- Add Vanilla Cream Layer: Spoon an even layer of the prepared vanilla whipped cream over the crackers, smoothing gently with a spatula to add softness and richness to each bite.
- Add the Berries: Scatter a generous layer of fresh mixed berries evenly on top of the whipped cream, ensuring vibrant color and juicy sweetness in every slice.
- Repeat and Chill: Continue layering graham crackers, vanilla whipped cream, and berries until you reach the top of the pan. End with a layer of cream so the berries sit beautifully on top. Cover and refrigerate for at least 4 hours, ideally overnight, allowing layers to meld and crackers to soften perfectly.
Notes
- Use room temperature berries to enhance natural sweetness and avoid cold shock to cream.
- Choose fresh, firm berries for best texture and flavor.
- Chilling overnight improves layering and softens crackers optimally.
- Handle layers gently to maintain light, airy texture without crushing crackers.
- Use a sharp serrated knife dipped in hot water for clean slices that preserve the cake’s visual layers.
Nutrition
- Serving Size: 1 slice (approximately 1/10 of cake)
- Calories: 250
- Sugar: 18g
- Sodium: 90mg
- Fat: 18g
- Saturated Fat: 11g
- Unsaturated Fat: 5g
- Trans Fat: 0g
- Carbohydrates: 16g
- Fiber: 2g
- Protein: 3g
- Cholesterol: 65mg
Keywords: Berry Icebox Cake, Vanilla Layers, No-Bake Dessert, Summer Dessert, Berry Dessert, Icebox Cake