How to Make Strawberry Crunch Cheesecake Cones
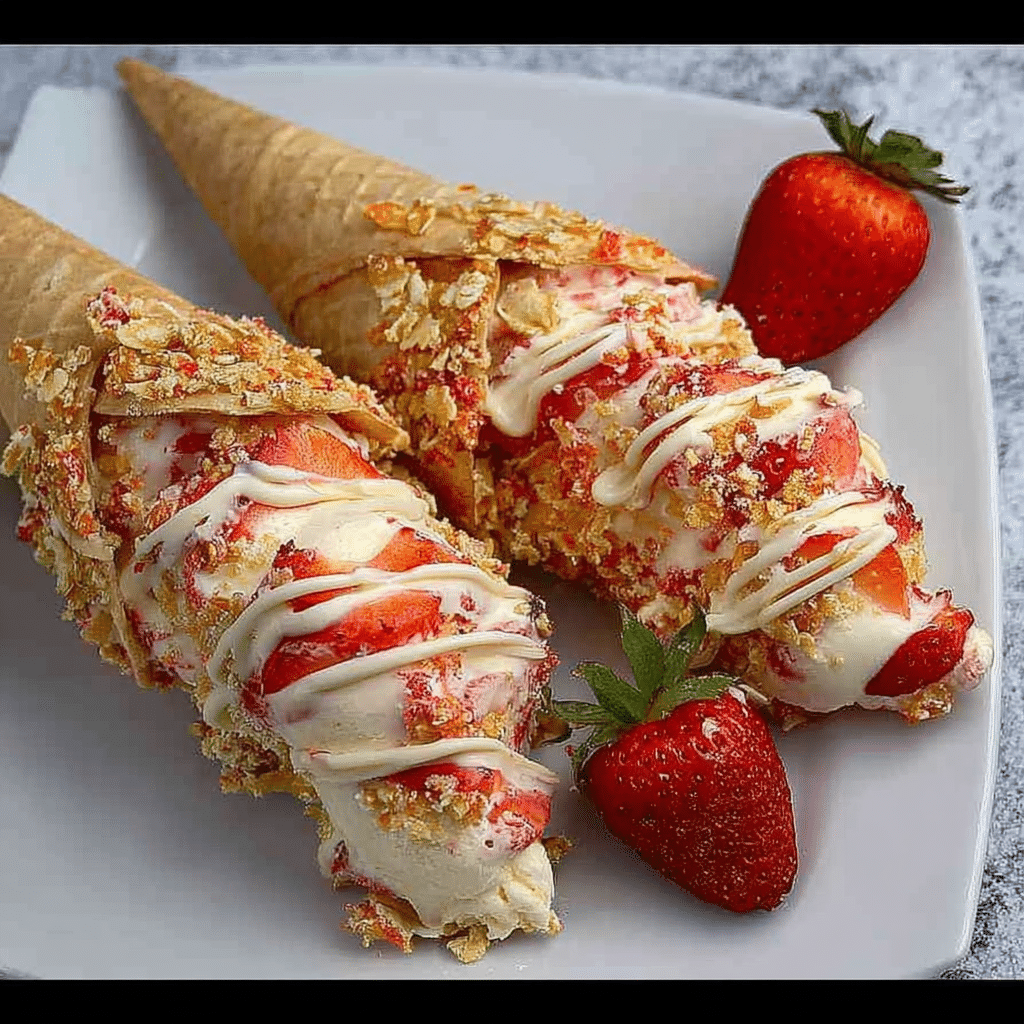
If you’ve ever dreamed of combining the creamy richness of cheesecake with the fresh, fruity zest of strawberries and a satisfying crunchy bite, then you’re in for a treat with Strawberry Crunch Cheesecake Cones. This delightful dessert brings together smooth cheesecake filling, juicy strawberries, and crispy cones, creating a handheld experience that bursts with flavor and texture in every bite. Perfect for warm days, celebrations, or whenever you want to impress without fuss, these cones are easy, fun, and absolutely irresistible.
Why You’ll Love This Recipe
- Effortless and Quick: With simple steps and easy-to-find ingredients, making these cones is a breeze for any skill level.
- Perfectly Portable: The cone shape makes it a mess-free treat you can enjoy anywhere, ideal for parties or picnics.
- Balanced Flavor: Creamy cheesecake blends beautifully with fresh strawberries and a crunchy texture for an exciting taste contrast.
- Customizable: You can tailor toppings and mix-ins based on your preferences or seasonal fruit availability.
- Visually Stunning: Its vibrant, colorful presentation makes it a crowd-pleaser and an Instagram-worthy dessert.
Ingredients You’ll Need
Gathering ingredients for Strawberry Crunch Cheesecake Cones is straightforward, and each element adds a vital touch—whether it’s flavor, texture, or visual appeal. This careful balance lets your dessert shine both in taste and appearance.
- Cream Cheese: Choose full-fat cream cheese for the richest, creamiest cheesecake filling.
- Powdered Sugar: Ensures a smooth, sweet filling without any graininess.
- Heavy Whipping Cream: Whipped to soft peaks, it lightens the cheesecake filling for a fluffy texture.
- Fresh Strawberries: Sliced for sweetness and vibrant red color, the fresh fruit is essential for that natural zing.
- Waffle Cones: Use sturdy, crispy waffle cones to hold all the delicious filling without sogginess.
- Crunch Topping: Crushed graham crackers, toasted nuts, or cereal flakes add the much-needed crunch in every bite.
- Vanilla Extract: A splash to deepen the flavor of the cheesecake filling.
Variations for Strawberry Crunch Cheesecake Cones
One of the best parts about Strawberry Crunch Cheesecake Cones is how flexible they are. Feel free to mix and match ingredients or switch them out to suit dietary needs and personal tastes—making the recipe truly your own.
- Dairy-Free Alternative: Use coconut cream and vegan cream cheese for a delicious plant-based option.
- Other Fruits: Try blueberries, raspberries, or a tropical mix for a fresh twist on the original.
- Chocolate Lover’s Twist: Add mini chocolate chips or drizzle melted chocolate over the finished cones.
- Nutty Crunch: Sprinkle chopped almonds, pecans, or pistachios instead of graham cracker crumbs for extra flavor.
- Low Sugar Version: Swap powdered sugar for a natural sweetener like monk fruit or erythritol to reduce sugar content.

How to Make Strawberry Crunch Cheesecake Cones
Step 1: Prepare the Cheesecake Filling
Begin by beating softened cream cheese with powdered sugar until smooth and creamy. Then, whip the heavy cream with vanilla extract until it forms soft peaks. Gently fold the whipped cream into the cream cheese mixture to create a light, fluffy cheesecake filling.
Step 2: Slice the Strawberries
Wash and hull fresh strawberries, then slice them thinly for easy layering inside the cones. The freshness of the strawberries will brighten each bite with natural sweetness and moisture.
Step 3: Crush the Crunchy Topping
Take graham crackers, nuts, or your preferred crunchy element and crush them into small pieces. This topping will add the satisfying texture contrast that completes the dessert.
Step 4: Assemble the Cones
Carefully spoon a layer of the cheesecake filling into the bottom of each waffle cone, followed by a sprinkle of the crunchy topping and sliced strawberries. Repeat to fill to the top, finishing with a creamy scoop and a decorative strawberry slice on top.
Step 5: Chill and Serve
Place the assembled cones upright in a container or stand, then chill them in the refrigerator for at least 30 minutes before serving to allow the filling to set and flavors to meld.
Pro Tips for Making Strawberry Crunch Cheesecake Cones
- Room Temperature Cream Cheese: Softened cream cheese blends more smoothly for a velvety cheesecake texture.
- Don’t Overwhip Cream: Stop whipping once soft peaks form to avoid curdling and keep the filling light.
- Use Fresh Strawberries: Fresh, ripe strawberries make all the difference in brightness and flavor.
- Secure Cones Properly: Use a cone holder or stand so the cones stay upright and filling doesn’t spill out.
- Crunch Layer Last: To keep the cones crispy, add the crunchy topping right before serving or store separately until ready to eat.
How to Serve Strawberry Crunch Cheesecake Cones
Garnishes
Top with a fresh strawberry slice, a sprinkle of powdered sugar, or a drizzle of melted white chocolate for an elegant finish that enhances the flavors and appearance.
Side Dishes
Pair your Strawberry Crunch Cheesecake Cones with a light, refreshing fruit salad or a scoop of sorbet to complement the creamy, crunchy dessert without overpowering it.
Creative Ways to Present
Serve cones in decorative holders or colorful cups for parties, or add edible flowers and mint leaves for a fancy, restaurant-quality touch that will wow your guests.
Make Ahead and Storage
Storing Leftovers
Place any leftover cones in an airtight container and refrigerate for up to 2 days. To maintain the crunchiness, keep the topping separate and add it when ready to serve.
Freezing
You can freeze the cheesecake filling in an airtight container for up to a month, but it’s best to assemble cones fresh to preserve cone crispness and strawberry freshness.
Reheating
No reheating is needed for these delightful treats; simply enjoy chilled straight from the fridge for the best texture and taste.
FAQs
Can I use frozen strawberries for this recipe?
Fresh strawberries are preferred for texture and flavor, but if using frozen, thaw and drain thoroughly before assembling to avoid soggy cones.
How long will the cones stay fresh once assembled?
For optimal crunch and freshness, consume within a few hours of assembly, or refrigerate up to 2 days with toppings added just before serving.
Can I make the cheesecake filling ahead of time?
Absolutely! The filling can be made a day in advance and stored covered in the refrigerator until ready to fill the cones.
Are there any nut-free options for the crunch topping?
Yes! You can use crushed graham crackers, toasted coconut flakes, or cereal flakes instead of nuts for a crunchy texture without allergens.
What’s the best way to keep the cones upright while filling?
A cone holder or standing them in a narrow glass helps keep the cones stable and prevents spills during assembly.
Final Thoughts
Strawberry Crunch Cheesecake Cones are a delightful way to enjoy the classic flavors of cheesecake with the fun and convenience of a cone. With their creamy filling, fresh strawberries, and crispy texture, they are sure to become your new favorite dessert for any occasion. Give this easy recipe a try and watch how quickly these cones disappear—you might even want to make a double batch!
Related Posts
- The BEST No Bake Cheesecake Recipe You’ll Love
- How to Make a Shamrock Swirl Pie Easily
- How to Make Kool-Aid Gummy Treats at Home
Strawberry Crunch Cheesecake Cones
Strawberry Crunch Cheesecake Cones combine creamy, fluffy cheesecake filling with fresh strawberries and a crunchy topping inside crispy waffle cones, offering a delightful handheld dessert perfect for parties, picnics, or any occasion. This quick and easy recipe features a smooth, sweet filling balanced with fresh fruit and a satisfying crunch, customizable to suit any taste or dietary need.
- Prep Time: 15 minutes
- Cook Time: 0 minutes
- Total Time: 45 minutes
- Yield: 6 cones 1x
- Category: Dessert
- Method: No baking required
- Cuisine: American
- Diet: Vegetarian
Ingredients
Cheesecake Filling
- 8 oz full-fat cream cheese, softened
- 1/2 cup powdered sugar
- 1 cup heavy whipping cream
- 1 tsp vanilla extract
Fruit
- 1 cup fresh strawberries, hulled and thinly sliced
Cones and Toppings
- 6 sturdy waffle cones
- 1/2 cup crunchy topping (crushed graham crackers, toasted nuts, or cereal flakes)
Instructions
- Prepare the Cheesecake Filling: Beat the softened cream cheese with powdered sugar until smooth and creamy. In a separate bowl, whip the heavy cream with vanilla extract until soft peaks form. Gently fold the whipped cream into the cream cheese mixture to create a light, fluffy filling.
- Slice the Strawberries: Wash, hull, and thinly slice the fresh strawberries for easy layering inside the cones, adding natural sweetness and moisture to the dessert.
- Crush the Crunchy Topping: Crush graham crackers, nuts, or your preferred crunchy ingredient into small pieces to provide a satisfying texture contrast.
- Assemble the Cones: Spoon a layer of cheesecake filling into the bottom of each waffle cone, sprinkle with crunchy topping, and add sliced strawberries. Repeat layering until cones are filled to the top, finishing with a creamy scoop and a decorative strawberry slice.
- Chill and Serve: Place the assembled cones upright in a container or cone holder and chill in the refrigerator for at least 30 minutes to allow the filling to set and flavors to meld before serving.
Notes
- Use room temperature cream cheese for a smoother filling.
- Do not overwhip the heavy cream; stop at soft peaks for best texture.
- Fresh, ripe strawberries are recommended for optimal flavor and texture.
- Secure cones in a stand or holder to prevent tipping during assembly.
- Add the crunchy topping just before serving to maintain crispiness.
Nutrition
- Serving Size: 1 cone
- Calories: 280
- Sugar: 18g
- Sodium: 150mg
- Fat: 20g
- Saturated Fat: 12g
- Unsaturated Fat: 6g
- Trans Fat: 0g
- Carbohydrates: 18g
- Fiber: 1g
- Protein: 4g
- Cholesterol: 55mg
Keywords: cheesecake, strawberries, waffle cones, no bake dessert, handheld dessert, summer dessert

